
Sunday, August 8, 2021
Tuesday, January 21, 2014
The Milwaukee and Wisconsin News: Woodworking Television Shows 01 21 2014
The Milwaukee and Wisconsin News: Woodworking Television Shows 01 21 2014: Woodworking Television Shows 01 21 2014 They are shows that either: 1. Require a table saw that weighs more than 3 men can lift and won...
Tuesday, September 10, 2013
The Milwaukee and Wisconsin News: Handmade Wooden Cases 09 10 2013
The Milwaukee and Wisconsin News: Handmade Wooden Cases 09 10 2013: Handmade Wooden Cases 09 10 2013 These were to be part of a novel that describes how to make things out of scrap wood but the beast ...
Saturday, July 13, 2013
The Milwaukee and Wisconsin News: "Humor" a new Youtube video by Thomas Paul Murphy
The Milwaukee and Wisconsin News: "Humor" a new Youtube video by Thomas Paul Murphy: "Humor" a new Youtube video by Thomas Paul Murphy >>Follow this Link: HUMOR<<
Friday, May 25, 2012
The Kings Chair


The Kings Chair is made entirely out of scrap wood. The inlaid wood symbols are a red cross, fish and a green clover.
I designed it because I sciatica in my back and wanted a sturdy chair with all the right dimensions and ergonomics. It has specifically engineered in dimensions and after I sit in the Kings Chair I feel a lot better.
Ask for one at your local furniture store today, "The Kings Chair" designed by Thomas Paul Murphy
Copyright 2012 Thomas Paul Murphy
ALL rights reserved. Reuse of any or all of this material in any way,without permission, is indeed a crime.
Originally published on 05 25 2012 at :WWW.themilwaukeeandwisconsinews.blogspot.com
Tuesday, May 22, 2012
The Milwaukee and Wisconsin News: Home Made Musky Bait it floats high above the surf...
The Milwaukee and Wisconsin News: Home Made Musky Bait it floats high above the surf...: For instructions on how to make one pay $5 to the link on the left to Thomas Paul Murphy This is indeed Curbwood Art as it was made fr...
Monday, April 2, 2012
Friday, March 23, 2012
Monday, March 19, 2012
The Dog Cage Table
I was visiting my sister three weeks ago and she asked if I would make her a table to go around her dog cage. She is always setting things on it and wanted to protect the cage. When I asked her how much she wanted it to hold she told me 200 pounds.
A few days later I drove past some discarded dining room table slats. The laminate on top had water damage. Carefully I stripped the laminate off and designed and hand crafted a leg base for this table. I think you will agree that it is very beautiful?


I reinforced the top with strand board and structurally located supports. The legs are made from cedar two by fours.
The trim pieces are also from Curb Wood.
Here is how the piece fits over the Dog Cage.
Thomas Paul Murphy
Copyright 2012 Thomas Paul Murphy
Originally published on 03 17 2012 at:WWW.themilwaukeeandwisconsinnews.blogspot.com
Friday, March 16, 2012
The Milwaukee and Wisconsin News: Curb Wood Art The Dog Cage Table 03 17 2012
The Milwaukee and Wisconsin News: Curb Wood Art The Dog Cage Table 03 17 2012: I was visiting my sister three weeks ago and she asked if I would make her a table to go around her dog cage. She is always setting things ...
Friday, February 3, 2012
Tuesday, September 7, 2010
X WING ROCKET FIRED COFFEE TABLE


X Wing Rocket Fired Table
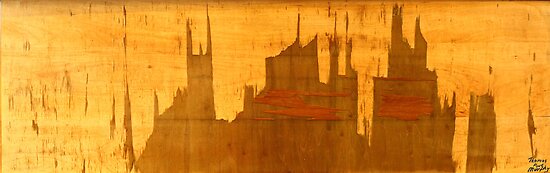
Symbolism of duality is exemplified by the rocket engine in the X Wing pattern that draws a contrast to the simplicity of Native American mirror images of bonfires. The table top being a resultant modular and plane structure could be interpreted by a statement such as this, "We go to the Moon and back but we still eat on level tables."
One question posed by this work is; "Which do we see as more beautiful, the modern day technology we are exposed to every day such as sleek new phones or personal electronics or the knots in the wood of the tabletop. Knots are considered by some imperfections, and by others more insightful the beauty marks of the wood, symbolic of its self propagation. This is an example of its strive for creation as it branches out a limb of new life. I like them so much I even added a few more "knots" to the tabletop to form a pattern in the wood. The branch of a tree analogous to creationism and a metaphor to the growth of human arms to hands. Which embody and symbolize the responsibility of creation as they grow from infancy to adulthood. I.e. Look at yours what have they created?
A comparison is drawn by the contrasts of the bonfire pattern in the X-Wing Rocket Engine Coffee Table, to overlooked understandings of our every day humanism. The "Enlightenment" of the piece begs the inherent rhetorical question: What would we ultimately find in our journey to Outer space? As it contrasts modern power versus the mystery of ancient relations by a campfire. The ancient cultures of our planet had to stay up late to track all those star movements didn't they? As we sit by the quiet sounds of a bonfire do we share a sense of nostalgic roots or tribalism? Do we enjoy this as much or more than the booming sounds of Sci-Fi movie's at a theater.
Further questions arising from my school of thought. How does this structure further represent the transition or creationary aspects of mankind to you? Another question for you is; "Before knowing my interpretation as creator of the object what was your initial frame of reference in terms of thought and terminology applied to this?" What was your abstract reaction via senses or feelings of thought first experienced? I.e. Your first Impression.
If you were to divide characteristics of the table into a timeline, is one aspect balanced on the other and then back to its own era of symbolism? How does this relate to the primary strengths of the idealism of human needs? IE Does the rocket put the bread on the table? Or is the Rocket not a necessary medium or middleman to "Us". Begging the question, "Who cooks like this?"
A parallel chronological analogy to the movie 2001 or 2010 Space Odyssey is created here. At the end of the movie we see a slab or abstract representation of a door in space. The movie poses the question, "What is technology and modern exploration of space leading to?" and rhetorically provides the answer the main protagonist is already personally familiar with but has been made separate from, as the pictorial representation shows loving images or memories of his own life. We go to the reaches of outer space and find a representation of ourselves that is integral to all creation. The enlightenment we seek is found to be the beauty within ourselves and our lives all along the journey.
God Bless,
Thomas Murphy
Copyright 2010 Thomas Paul Murphy
Monday, September 6, 2010
TURKEY TABLE

The design of this end table encompasses a duality of themes. On the one side you see what resembles Turkey or Hawk tail feathers on the other an inlaid chessboard. The inlays made from repurposed/ reclaimed dark hardwood. Certain details of the forest are more important to me than the trees.
This work of art I consider my tribute to Native Americans
Tuesday, July 20, 2010
The Black Walnut Card Table 07 20 2010


There were three parts to recreating this Samsonite card table and chairs that were built with higher standards of quality than we have today. Why do you ask did I refinish this card table and chairs? Could I not go to a department store and buy a new one today? If I bought a new one, what would I do with the old one, through it in a dump pile like businesses do people they don’t like? As I go about describing how I refinished this card table you will see there were many engineers principals used in its construction more than 35 years ago. I have found that principals such as these are lacking in our manufacturing. Short cuts are taken by corporate America today in this fashion. They say the best machines have the least number of parts. That is only true if the time was taken to think about them and make them better with fewer lasting parts. I could go on for 10 pages with this but frankly I find it quite exhausting. But most importantly as you look at the pictures of the beautiful new chair and table that I created you will find that you cannot buy anything like this today. Until of course someone like you reads this and steals the design and mass produces one. The story of my life.
Three Disparate Parts where considered to be refinished.
1. The Table Top
2. The Seat Cushions
3. The Metal Frames of the Chair and table.
The Processes
I. The Table Top
The table top was connected to the frame with 12 brass coated screws that were screwed into the rectangular channel steel that formed the square collar the legs are part of. L brackets were used at these 12 points to connect the table top to the square supporting frame. Underneath the vinyl cover of the top was a piece of particle board and the L brackets were attached to the top with rivets that were inset flush with the top. The particle board was reinforced around its perimeter with four 3” strips of particle board the same thickness as the top. This gave the edge perimeter twice the thickness of the center and made for a stronger table while still being lighter than if the particle board was doubled throughout the whole top. The holes of the L brackets lined up perfectly with the holes in the top of the leg framework. A goal in refinishing the table was to keep it light. Because that is what card tables are supposed to be. I decided to replace the whole top. This presented problems in terms of getting the L bracket holes to line up under the new solid piece top. The new top is made of Tarkett Black Walnut interlocking flooring I bought at Menards. The issue was how to attach those L brackets to the table top without having the heads stick out the top. But I will get back to that in a while.
Five strips of the flooring were glued together lightly at the underside of the interlocking seam with white glue. I called the manufacturer and asked what the best type of glue to use was and he said PVA glue. It turns out PVA glue is white carpenters glue according to my internet search later. Both I and the Ace Hardware salesman where baffled as we looked for PVA glue on his store shelves. I told the manufacturer when I called him that I was concerned that the wood would puff up when the glue was applied and ruin the top. He told me the PVA glue would have lower water content. He said tight bond made a glue of this nature.
Anyway the glue I used worked fine. The next day I clamped my new gross top surface to the old one and used a bottom bearing router bit to cut out the top. The first small bit I used burnt out and broke. I took more care with the second. And unplugged the router and took a razor knife to the cutting surface to remove any burnish buildup that dulls and ruins them quickly. With top aligned to the other top I cut around it. Upon cutting one side I removed the clamps from that side and placed them on the others. If there was any misalignment during cutting, or any slipping or sliding the new top would become nongeometrically ruined.
With the top cut the next step was to figure out how to attach the L brackets. This was a little tricky. Remember they have to align precisely or new holes would have to be drilled in the framework, sometimes when new holes are drilled you drill all the way through and ruin it. It is also the mark of a novice or nonplanning types to have to drill “excess” holes. The true Craftsman learns to lesson variables and variability’s such as these.
To get the holes to align I drilled out the rivets from the old L brackets and set the old cardboard top on top of the face up bottom of my new top and took a sharpened pencil and stuck it in through the holes and marked the positioning. Now remember I didn’t want Frankenstein rivets sticking up through my new top surface, so what did I do next? I marked in from the square edge of my table using a pencil a perpendicular line from the edge that intersected these holes plus an inch or so extra. It turns out that the holes where all exactly 7/8” in from the side so I indeed had both coordinates to properly position new holes. But where would I put them. I made the construction of the edge similar to the original engineering. I cut four ~ three inch strips of old basement paneling and fit them to the bottom. This required precision fitting of two of them that were “keyed” or inset in sandwich style between the other two. The objective was to cut a tight loose fitting puzzle that I could then mark holes to. Using the bottom side of the new table top as a guide or support I placed the perimeter framework along its edge. And carefully laid the old particle board top down on it and marked the holes again. I removed the old top and marked everything uniquely in terms of its place of reference on the new top. As a double check I used my 7/8” in from side and the perpendicular marks to check for proper alignment. I then took my Makita and drilled 1/8 holes and my marked spots. Countersunk the abutting surface that would be glued and riveted the L bracket onto these strips. The rivets on the the side to be adjoined needed a little filing. And on the L bracket side I fixed them in place at a right angle using Eco Glue, to maintain their strength by keeping them from spinning. I then scuffed the adjoining surfaces with 80 grit emery clothe and used some Liquid Nails Clear Small Construction Project glue that I once bought free after rebates from Menards to attach the strips, with reference to their markings.
The next day I took a coping saw and loped off the corners of the underlying framework that stuck out. They were attached later and therefore not rounded with the top edges at that time. The best tool I found to use to even this edge surface was a Microplane. This is a razor sharp planer that is very good for finishing work. Carefully I worked the edge with it so as not to ruin the top surface. After I got it reasonably smooth I sealed the edge with Gorilla white Wood Glue. After that dried I finished the particle board edge with dust from the particle board mixed with wood glue to give the edge body. I then used a mixture of water based yellow paint, joint compound and wood glue to give it a cake like looking lemon edge. This was then sealed with Polyacrylic clear coat.


II. The Seat Cushions
The seat cushions were removed and cleaned with vinegar and a scrubbing with a microfiber clothe. I found a very interesting product at the hardware store “Menards” it was a can of spray paint made by Rustoleum for use on vinyl/ and upholstery. I chose the sand color. This paint was easy to use. I purchased two cans. These seats look like the fine leather from an Italian Sports car.
III The Metal Framework of chairs and leg structure
These I cleaned of dust with Krud Kutter. And then sanded off dirt spots with 400 grit sandpaper, sometimes coarser sand paper was used. The framework was then primed with a Rustoleum automotive gray automotive primer sealer and then spray painted with yellow Rustoleum Paint. They were then clear coated with automotive wheel paint by Rustoleum. The table leg structure got an extra clear coat of Polyacrylic paint.
Reassembly went easy the holes matched up and this is another work of art.
God Bless Those Who Take The Time And Have The Patience to Explain and Teach Those Who We Often Find Most Inconsiderate Of Others And God Bless Those That Try and Make Honest People Out of Thieves
Thomas Paul Murphy
Copyright 2010 Thomas Paul Murphy
Friday, May 7, 2010
The Dining Room Table


Dining Room Table
This table took two months to completion.
The ¾”slat pieces in this table were from reclaimed wood. A neighbor long ago had built mock ceiling beams. The recent resident tore them out during remodeling and put them curbside for pickup. The 6” x 14’ pine boards were painted brown. Lumber of this length would be very expensive to buy. And consideration was also made in how long a tree that size would have taken to grow. After talking with Aaron my neighbor and asking permission, I dawned my best Hamburgular thievery walk- short and quick pointed steps. I snatched those boards up and brought them back to my lair (house).
Once finish sanded the top was oil stained to the resulting color effect of lemon/natural, a color that brightened up the dining room considerably. The bottom, top and sides of the tabletop surface were coated with Envirotex Lite Epoxy, for a durable glass like top finish. The epoxy proved to be a challenge by coating the garage during the cold Wisconsin winter. I installed a heating lamp and coated when I could keep the surface temperature above 50F and kept the resin and hardener inside before mixing. After the final flood coat I brought the top inside after a day or two to complete the slow cure after initial hardening.
After a few course changes it turned out beautifully and was ready for our Christmas dinner with cards played on it afterwards.
The laminated board structure of the top is reinforced with four 7/16” threaded rods snugging it up cross sectionally.
The leg structure is proprietarily stained. The resulting green embossed pattern to the grain is meant to symbolize new growth that blossoms into the contrasting stable interwoven structural top that weighs over 130 pounds. The brown washers with black bolt heads securing the legs create and symbolize the “petrification” of a witch’s eye
COPYRIGHT 2009 THOMAS PAUL MURPHY
Outdoor Work Bench

Outdoor Work Bench
This solid structure is made from discarded chalet/clubhouse outdoor bench seat. The slabs were made modular to limit any warp age present with larger slab architecture. It is held together with with threaded rods.
The top designed to resemble red cobblestone bricks or neatly placed strips of bacon, interpretation dependant on influence of mood.
The leg structure constructed of new treated lumber design with lateral leg wedge support to prevent sway or limit joint separation on sideways movement.
The mass of slab reaching near limit to axial manipulation and positioning before back strain occurs.
The legs stained green takes on a journey of a life of a plant from when the first green buds emerge from the soil to maturation. The respect for maturation further evidenced in this wood lasting for over thirty years outside and then reworked to represent a youngness of construction. The gloss coating oil from bacon in frying pan; “perfume on a pig”, no instead the glorification of this aged wood to represent the transformative strength of solid brick, embellished with age.
In summary a tribute to wisdom and new wisdom attained with age.
Copyright 2009 Thomas Paul Murphy
Monday, April 19, 2010
Pick Axe Four Dollars

This pick axe was made from Walnut wood. The wood came from the large branch of a tree in our yard. When we had it trimmed for safety reasons we saved the wood and had it rough cut to planks. We took it in the trunk of our 1991 Buick LeSabre and to a field south of Franklin WI. My father drove our Champagne colored Buick on the canted edge of a farmers sod field all the way around and then we drove down a hill and through some trees. There we found some men working. One of them was the owner of a portable saw mill. A horizontally articulated band saw was mounted on a conveying framework that tracked the blade to cut a fixed board width down the length of the log. It was very noisy and dust was flying. Sometimes it skipped a little and jolted back to form a roughly surfaced cut. The wood was left to dry in the yard and somewhat stacked with interdispersed slats. It wasn’t protected enough from the elements and warped and eventually formed some black rot. My father and I made things with it through the years. Good strong dense hardwood with a strong core. The warpage and rot did prove to be a challenge to expedited woodworking but indeed a worthwhile endeavor.
The metal pick part was bought from; I believe it was SurplusCenter.com for three or four dollars. The metal had an oxidized black finish. Using the iterative process it was cleaned with soap and water, emery cloth, wire brush, vinegar, spray can primed hung up to dry and finish painted with spray can gold colored paint and then clear coated.
The Walnut is actually two pieces of walnut laminated together, because that is all the wood I had to use to make it and because it is stronger that way. The end tip of the handle has a round brass fitting I custom made from recycled electrical parts that keeps it bastioned together in case I have to dig more extremely for gold with it.
The wooden handle is finished to smooth gloss and fitted much like my story of making hammer handles found elsewhere in my blogs.
And yes making nice crafts, charms, tools, and designs does tend to enrich our lives. Who knew?
God Bless,
Thomas Paul Murphy
Copyright 2010 Thomas Paul Murphy
Steamship Coat Rack

Steamship Coat Rack
This coat rack was made from recycled oak. Three skinny strips were laminated together lengthwise. There are screws that were countersunk and dowels covered the heads. When doing a project like this it is important not to “sink” the screws were the chimneys of the “steamship” are to be sunk, otherwise you risk potential weakening in finished structure as well drilling through the screw issues.
The “Steam Posts” were made from a recycled broken broom handle. Just because something is broken in one place does not make the whole of it worthless.
Contrasting stains were used to offset the posts from the “Hull” in appearance.
The brass fixtures that are mounted to the studs behind the drywall were purchased from Lowes home improvement store.
With stylistic design this coat rack accentuates the entrance to our house. I didn’t think of christening it with a name. Just not appropriate.
God Bless,
Thomas Paul Murphy
Copyright 2010 Thomas Paul Murphy
The Regency Cane


The Regency Cane
This is my woodworking logo as pictured on this regency can I made for my father.
The recycled oak wood was laminated lengthwise and turned on the lathe. It has an Epoxy Lite finish I applied at the same time I coated the dining room table I made.
I find Epoxy glues and finishes to be one of the most potent neurotoxins known and when I mix I try to get more than one job done with the same batch and let it dry in the garage and not in the house. A very good principle. Let applied glues dry in the garage and not in the house where you and your loved ones live. Loved ones like to breathe fresh air the best. Trust me on this one.
The head of this cane was the Regency model and came from Rockler woodworking. It is heavy and cost about $13. If I were to make another cane for my elderly parents I would opt to find a very light can head. Say plated and hollow strong aluminum or alloy. They don’t like to use this cane because it is too heavy. It is very strong though. The heads on these are fitted somewhat like a compression plumbing fitting. It is an iterative process to sand a little off around the top and see if it fits before I finally added some Eco Glue and screwed it on tight for a temporary permanence. That is the terms 3M used to describe its yellow sticky pads when it first introduced them.
God Bless,
Thomas Paul Murphy
Copyright 2010 Thomas Paul Murphy
Chess Boards


Chess Boards
I made two of these Chess or Checkers boards. They are made from Cherry, Walnut, Cedar and Pine.
The one with the Cherry wood squares is a lot nicer. As the grain of the Cherry has a sort of pearlescent shimmer.
The boards start out as eight pieces of wood strips. The strips are actually three pieces of laminated ~ ¾” strips. There is a trick to getting the Squares to line up square and that is done with the router. The Cherry squares are ¼” thick inserts that will not pop out like traditional inlays. The eight strips are held together with three ¼” threaded rods holding it together. They are framed in Walnut and finished with my custom stain. Strength and durability of structure all the hallmark of good design. What kind other kinds of foundations would we have in our lives?
I have found that a sound tenet of good design is also to use odds and ends pieces to see what you can come up with. It is counter to our culture of only buying new when we need something which puts little faith in what we have to work with already. This is a harder way to design things and all but impossible to do accept for the thoughtful man. If it is worth doing it is worth doing well and how else are we to do this accept for with what we have already. A good principal to follow. It kind of reminds me sometimes of that Spaghetti Western “The Good, the Bad and the Ugly.” The scene where the character Tuco goes into the gun shop and takes the chamber from one gun, the barrel from another and the handle from another, and it works better than each of the three would have before. For all his flaws and indeed crimes, this ability was not one of them.
God Bless,
Thomas Paul Murphy
Copyright 2010 Thomas Paul Murphy
Train Crossing Sign

Train Crossing Sign
This is an abstract representation of a railroad crossing oncoming train signal. LED lights were fitted in old boats trailers light fixtures and mounted to this cross. They were wired into a night sensor based solar powered circuit. It blinks from one bulb to another. The wood was salvaged from old deck wood.
What can I say, the pieces of the puzzle where there for me to put together and I had to do it; to make this do not cross sign. It kind of reminds me of a windmill sometimes too.
I mean, what the heck, it’s better than a lawn gnome. I mean who want a gnome on your lawn, right. There evil twisted face little creatures with an apparent mal intent. They should be outlaw all together.
God Bless,
Thomas Paul Murphy
Copyright 2010 Thomas Paul Murphy
Wednesday, March 24, 2010
Sylvia Buccatti reviews Thomas Murphy's "The Window Box Bench"

“The Window Box Bench”- Artistic Review
Thomas Murphy has done it again! With this simple design of a bench seat he proves that large scale engineering principals and designs when scaled down to smaller proportions embody both the same economy of material with the emphasis on strength of structure.
But what he adds to this bench is the artistic elements of beauty made into form. Stout legs to this bench bear a resemblance to elevated highway support structures, although he changes the whole tone of the piece with the augmentation of a color that reflects a surreal feeling of “Spring Green” to the artistic aficionado.
He is drawing a most noteworthy contrast to the Reddish Wood bench seat top, in effect he makes a statement, “Our old growth natural Redwoods should be cherished and supported with the most solid structures we are capable of…a creation of form that offers new hope of complement to them.”
He titled this one, “The Window Box Bench” and with love and admiration I see why~
Sylvia Buccatti
About the Author,
Sylvia Buccatti was educated and trained in Renaissance arts and literature in Florence and has recently moved to the United States.
Friday, March 12, 2010
MURPHY'S RELIGIOUS CROSS COMPUTER ACCESORY TABLE

The blended religious motifs that are incorporated into the theme of this table include a cross for Catholicism. The center an Asian symbolism of balance. The four orbiting “sparks” signify or represent the ideal confluence of goodness the power of which radiates atomically through time and space. I got an A in Art History in college and I’m good at gobbledygook.
Wednesday, March 10, 2010
OIL DERRICK TABLE

The little boats are made from scrap wood from other projects. I made four of them and gave one to the daughter of a neighbor who is sick.
As for the table, the legs are stained green and angled up like an oil rig. Those circles are made from green marble and were cut out by hand from a 3/8" x 12" x 12" square that I bought from the Habitat for Humanity resale store for 69 cents. When I made this table I was trying to symbolize the new standard of green energy cars to come. The green circles representing engine cylinders. But now I see them more as little lakes with the boats on them. It sits in our living room by the window. The boats I often think of as the Santa Maria, the Pinta and the Nina or Mayflower or whatever. If you like the table stay tuned as I plan to post pictures of other tables that I have made. One is like this one but has kind of a church symbol inset in it. The other is a coffee table with and laminated X Wing Pattern. There is a bar table with daisy petal legs, a coffee table made from the wood of my fathers old desktop that was cracked and another table with Turkey feathers inlaid as well as a checkerboard. Plus countless others to list all at once.
Most of the wood I use is "secondhand". It must be cleaned carefully and thoroughly with reference to modular utility once it is cut to size. Once you try it I am sure that you will find re purposing wood as rewarding as I do.
Thomas Murphy
X WING COFFEE TABLE


X-Wing Coffee Table
This coffee table has a laminated through to surfaces X-Wing pattern which contrasts the silliness of its well groomed poodle like feet to today’s technological aspirations. The contrast created here is also a parody of our science and culture.
Tuesday, March 9, 2010
DAISY BAR TABLE


This bar table is meant to incorporate a dynamism motif experienced when friends meet for drinks.
I initially made the round circle for a boxing speed bag platform but repurposed it with a square spindle cog center.
It embodies a uniquely lathed spindle pedestal post and daisy propeller with Green Bay Packer themed footings.
This was one of my favorite designs.
COPYRIGHT 2009 THOMAS PAUL MURPHY
Thursday, February 25, 2010
Hand Made Hammer Handles


Hand Made Hammer Handles 02 25 2010
The head of a hammer will usually outlast the handle. The head gets slight surface rust and some metal fatigue. But the handles tend to rot and corrode around the center of the head.
You can easily make a new one from a piece of hardwood. And it is a good project to do with your son.
You can start by looking for an old hammer you don't like to use because it is old or buy one from a rummage sale.
You can make the handle out of hardwood left on a curb or buy some from a Habitat for Humanity Resale shop. You can even carve a new handle from an old shovel handle. I made more than one handle out of an old shovel handle. The wood in the center of its stock is usually as good as new.
Your working imagination is the limit to your style or design of the handle.
In the pictures you see some of my grandfathers old ball peen heads placed on handles I created. The elongated triangular shape of the smaller handle is very nice to work with. The larger ball peen hammer is made from four pieces of two different kinds of wood, giving it a stronger multicolored handle as the pieces offset in one direction. The effect was created by the way they were glued together.
Clean the metal hammer head with vinegar and sandpaper inside the hole, and outside. Four hundred grit works well. You want to make the head look as shiny as you can to augment your new handle. It is good to file its striking plane straight and smooth with a file also, give a little round off to the edge also.
Make the handle larger than you would expect it to be in the end as you might need to trim off some excess above the head.
Get the piece down to rough size with a band saw or other saw. Then make some marks as to rough size on the stock and freehand sand on a stationary belt sander. Use the iterative process to shape the end to fit the head. Tools needed here are files, sandpaper, small planes etc. If you take a caliper and measure the top and bottom holes of the head you can get an idea of how big that end of the handle should be. Fix the measurement taken from the metal head and hold it to the end of the wood handle. The hole might be somewhat oblong.
When you think you have a good fit when lightly forced on. Use some polyurethane glue and put the head tightly on the handle. When using the vice to hold the piece, make sure you are using a mar free setup, I.e. held in place with wood or/and rags. This is an art.
After setting the head in place wipe it with a thin and tight coat of the same polyurethane glue. This seals in the shine very well and prevents dulling with rust.
Set it in your garage to dry and the next day trim any excess wood off the top. If there are tiny gaps between the head and the handle you can add some sawdust and glue to fill them. Sawdust mixed with polyurethane glue make the glue act differently; use a little less sawdust than you would if mixing with wood glue.
The smaller handle is oak with a red stain. The larger I believe is made from a Poplar snow shovel handle I broke off while heaving 30" lengths of heavy wet snow.
You will be proud of making these handles that exemplify the art of fine craftsmanship. You might even think them too good to use, but don't do that. As you use them they will impart their fine craftsmanship into your works.
God Bless,
Thomas Paul Murphy
Copyright 2010 Thomas Paul Murphy
Subscribe to:
Posts (Atom)